Publishing Your First App: App Store Connect and Play Console
Both stores document their own submission flow well. What neither documents is the sequence — which decisions are permanent, which paperwork has a month-long lead time, and which step is the one that actually delays first launches.
On this page
- What do the two developer accounts cost and require?
- Which setup decisions can you never change?
- What has to be ready before you create the listing?
- How do you set up App Store Connect end to end?
- How do you set up Play Console end to end?
- Which declarations trip up first-time publishers?
- What actually happens when you press submit?
- How long does each platform really take?
- What should be scheduled for launch day itself?
- Frequently Asked Questions
What do the two developer accounts cost and require?
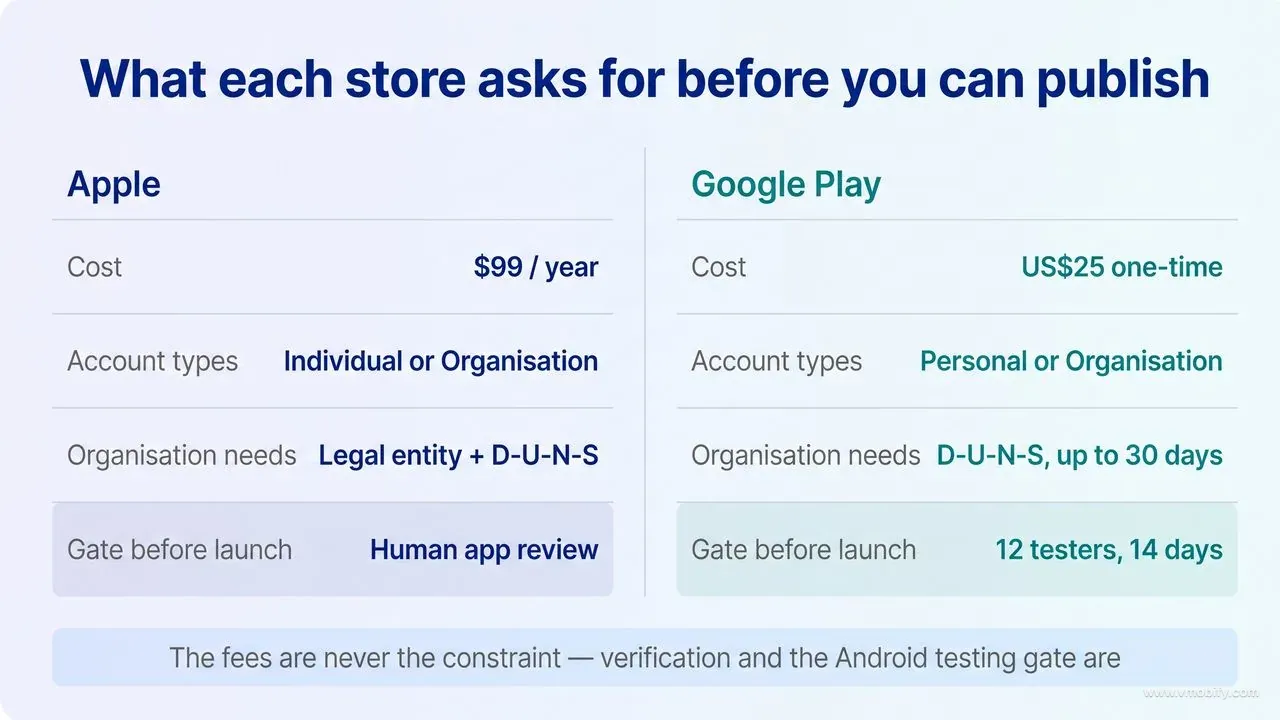
Apple charges $99 a year for the Apple Developer Program; Google charges a one-time US$25 registration fee — and on both platforms the money is the easy part, while identity verification is what actually takes time. Budget for the paperwork, not the fee.
What each platform asks for:
- Apple Developer Program — $99 per year, per Apple's membership comparison. An individual enrolment needs your legal name and a payment method. An organisation enrolment needs a legal entity, a D-U-N-S number and evidence you can bind the company. There is also an Enterprise Program at $299 a year, which is for internal-only distribution and is not what you want for a public app.
- Google Play — a US$25 one-time registration fee. Google states you may be asked for "a valid government ID and a credit card, both under your legal name," and prepaid cards are not accepted.
The decision that matters more than the fee is personal versus organisation, and it is not symmetrical across the two stores. On Apple, an individual account publishes under your personal name, which is visible to every user on the listing. On Google, a personal account publishes under your name too — but it also triggers the closed testing requirement if the account is new.
An organisation account on Google Play requires a D-U-N-S number, and Google warns that applying for one can take up to 30 days. That is the longest single lead time anywhere in a first launch, and it is invisible until you hit it. If there is any chance you want an organisation account on either store, start the D-U-N-S application now — before the app is finished, before the listing exists, before anything else on this page.
Verification itself deserves a word, because it is the step most likely to stall silently. Both stores are matching the details you typed against documents, and small mismatches hold things up: a name on the payment card that differs from the government ID, an address that does not match the entity registration, a company name entered with a different legal suffix than the one on file. If verification has not moved in a week, the cause is almost always a mismatch of that kind rather than a queue — check the details character by character against the source document before contacting support.
Across the 300+ apps we have managed since 2013, the launches that slipped worst were almost never blocked by engineering. They were blocked by an entity that did not exist yet, a verification document that took two weeks to arrive, or a bank account that was not ready to receive money.
Which setup decisions can you never change?
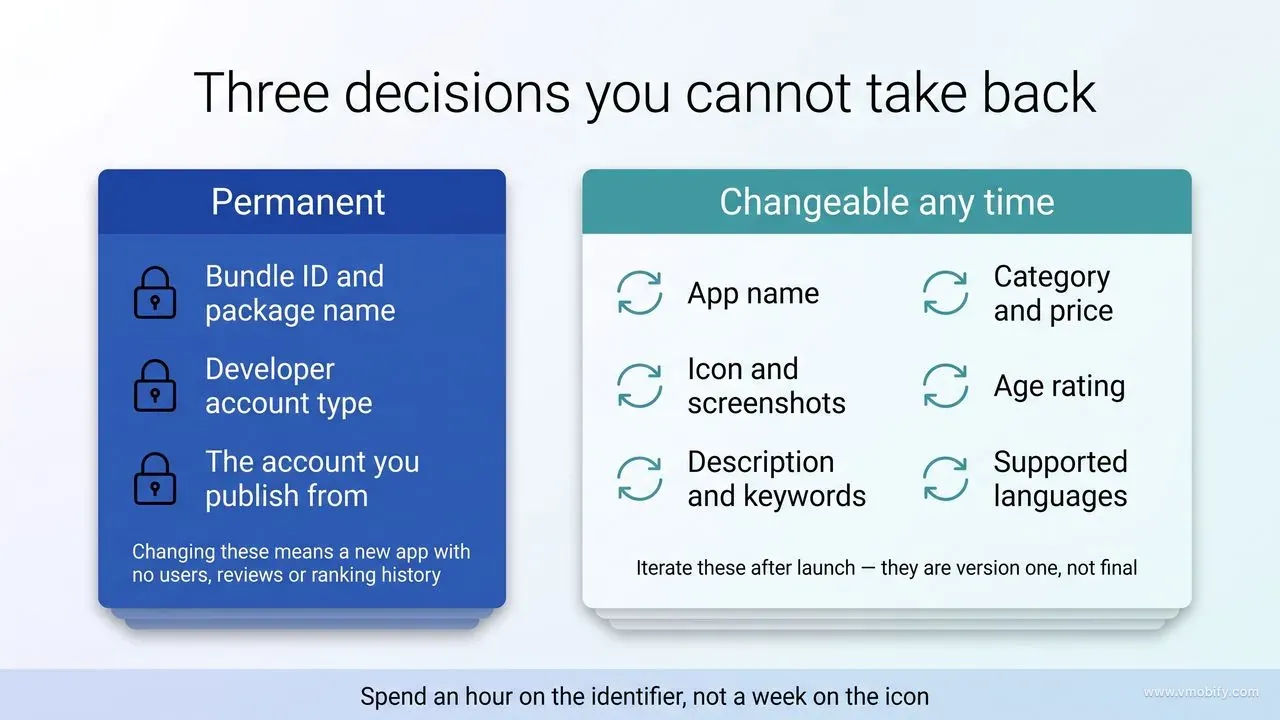
Three things are effectively permanent — your bundle ID or package name, your developer account type, and to a lesser degree your app name — and every other setting can be revised after launch. Knowing which is which tells you where to spend your deliberation.
The genuinely irreversible ones:
- Bundle ID (iOS) and package name (Android). Once an app is published under an identifier, that identifier is that app forever. Changing it means shipping a new app that no existing user upgrades to, with zero reviews, zero ranking history and zero install base. Choose a reverse-domain identifier you will still be comfortable with in five years, and do not encode anything temporary in it — not a version, not a client name, not a platform.
- Developer account type. Moving an app between accounts is possible on both platforms but is a transfer process with conditions, not a settings change. Deciding personal versus organisation after launch is expensive.
- The account the app is published under. On Google Play in particular, production access is granted to an account rather than to an app — so completing closed testing on one account and then publishing from another means starting again.
Things people agonise over that are genuinely changeable: your app's category, price, description, screenshots, keywords, icon, supported languages, age rating and even the app name. All of these can be updated with a new version or a metadata edit. The app name carries a caveat — renaming a ranking app resets some of the association users and the store algorithm have built, so it is reversible mechanically but not costlessly. Our guidance on choosing it well sits in the app store optimisation guide.
The practical implication: spend an hour on the bundle ID and the account type, and do not spend a week on the icon. You can iterate the icon next Tuesday. You cannot iterate the bundle ID at all.
What has to be ready before you create the listing?
Both stores will let you start a listing before you have the assets, and both will block submission until you have all of them — so assemble the set first and fill the forms once. The list is short and almost none of it is code.
What you need in hand:
- A privacy policy at a live URL. Required by both stores, and it must actually describe what your app collects, how it is used, how long it is kept and how a user requests deletion. Generic generator output usually fails on the retention and deletion clauses.
- A support URL or contact. It must resolve from outside your network — check it in a private window on mobile data.
- App icon at full resolution, with no transparency and no rounded corners baked in.
- Screenshots for the required device sizes. Both stores specify sizes; both reject listings whose screenshots are only splash screens or logos. These do more for your conversion rate than anything else in the listing, so treat them as design work rather than a form field.
- Title, subtitle or short description, and full description, written against a keyword set rather than improvised.
- An SDK inventory — every third-party library in the build and what data each collects. You will need this twice, once for Apple's privacy details and once for Google's Data safety form.
- Tax and banking details, if the app is paid or has in-app purchases.
On screenshots specifically, two decisions matter more than the rest. The first screenshot is the one most people see, because a large share of store visitors never scroll the gallery — so it has to communicate what the app is for on its own, without the benefit of the four that follow. And captions generally beat bare device frames: a screenshot showing a screen with a short line of text explaining what that screen does gives a stranger something to read, whereas an unlabelled screenshot asks them to infer your product from a UI they have never seen.
Both stores also accept a preview video, and it is worth knowing when not to bother. A video helps when the value of the app is in motion — a game, a camera tool, anything where the interaction is the product. It adds little for a utility whose value is a state rather than a sequence, and a mediocre video is worse than none because it occupies the first slot in the gallery where your strongest screenshot would otherwise sit.
The last one is worth calling out because it is the most common way a first launch stalls after approval rather than before it. Both stores require signed agreements plus tax and banking information before they will let you sell anything. Getting an app approved and then discovering it cannot take payment for another week is a bad and entirely avoidable feeling.
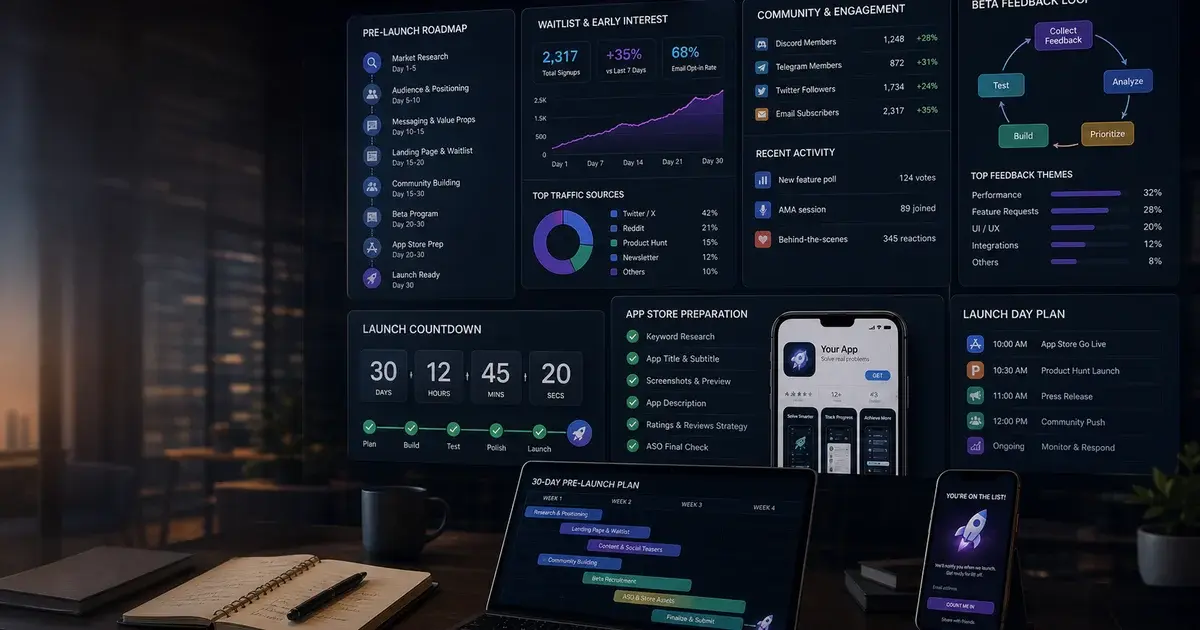
Do this work during development, not after. The listing assets are also the assets you need for a pre-launch push, so building them early pays twice.
How do you set up App Store Connect end to end?
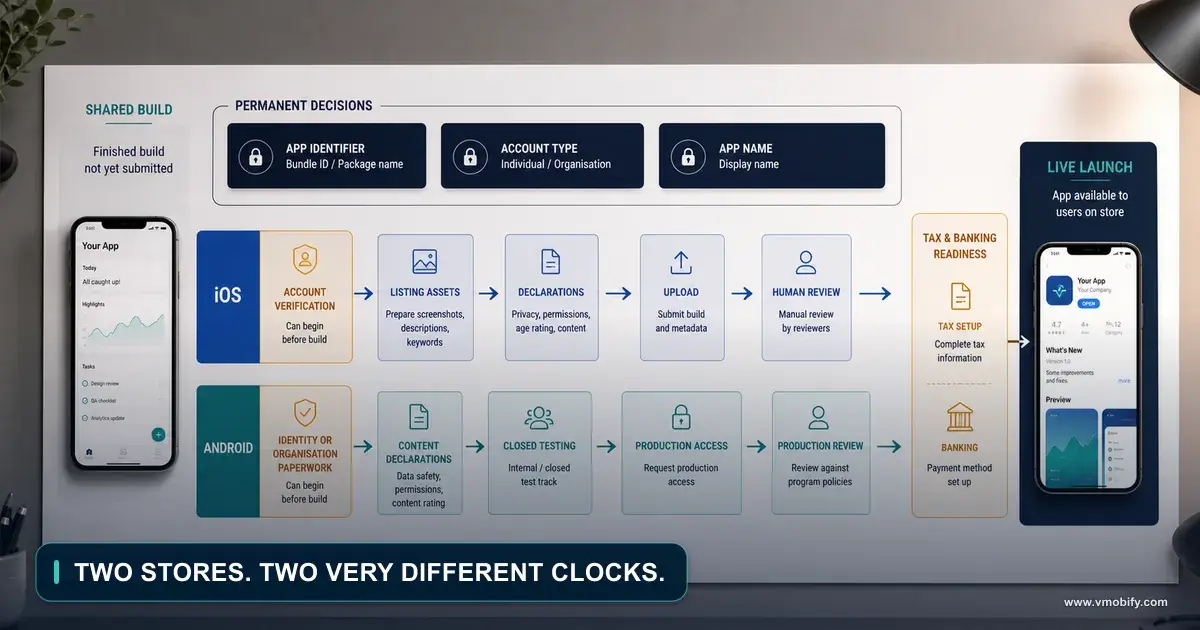
The iOS path is: enrol, create the app record with its bundle ID, upload a build from Xcode, complete the metadata and declarations, then submit that build for review. Apple's submission documentation covers each screen; what follows is the sequence and the parts that trip people.
The order that avoids rework:
- Enrol and accept the agreements. Paid Applications agreement too, if you will ever charge — it gates everything commercial and takes a signature from someone with authority.
- Register the bundle ID in your developer account, with the capabilities your app uses. Getting this wrong surfaces later as signing errors that look like build problems.
- Create the app record in App Store Connect and bind it to that bundle ID.
- Upload a build from Xcode or your CI. It appears in App Store Connect after processing, which takes minutes and occasionally longer.
- Use TestFlight before you submit. Internal testers need no review; external groups get a lightweight review. This is the cheapest way to find the crash that would otherwise be a rejection.
- Complete metadata, privacy details and age rating.
- Fill Notes for Review with demo credentials and the path to anything non-obvious.
- Submit, choosing whether release is automatic or manual on approval. Choose manual for a first launch — it lets you decide the moment you go live rather than waking up already launched.
TestFlight is worth more attention than most first-time publishers give it, because it is the closest thing iOS has to a free rehearsal. Internal testers — people on your App Store Connect team — get builds immediately with no review at all, which makes it the fastest way to put a real build on a real device. External testers can be invited by email or by a public link, up to a limit well beyond what a first launch needs, and their builds go through a lightweight review that is far quicker and more forgiving than App Store review.
The practical use is to run your own miniature version of what Google forces on Android: get the build in front of ten people who did not write it, watch where they stop, and fix that before a reviewer sees it. Builds expire after 90 days, which is a useful forcing function rather than a limitation. The crash you find in TestFlight costs you an afternoon; the same crash found in review costs a rejection and a resubmission cycle.
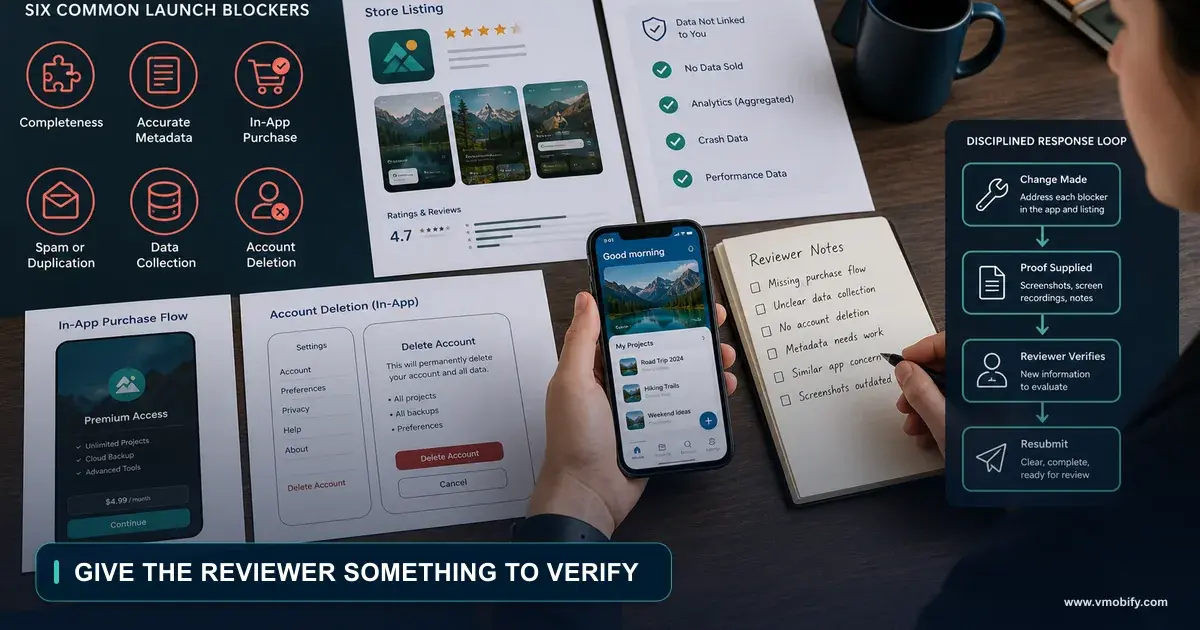
Two things surprise first-time publishers. First, in-app purchases must be submitted alongside the binary for a first version; configuring them is not the same as submitting them. Second, App Store Connect will happily let you submit with a demo account that does not work, and the resulting rejection is the most common one there is — the other rejection patterns are worth reading before you press submit rather than after.
How do you set up Play Console end to end?
The Android path is: register, verify your identity, create the app, complete a long list of content declarations, upload to a testing track, then — for a new personal account — run closed testing before production is even an option. The declarations are longer than Apple's and the gating is different in kind.
The sequence:
- Register and pay the US$25 fee, then complete identity verification. Start here, because verification can block everything downstream.
- Create the app and set the package name. Permanent, as covered above.
- Work through the Dashboard tasks. Play Console gives you an explicit checklist and will not let you publish until it is complete. It is long but genuinely useful.
- Complete the content declarations — Data safety, content rating questionnaire, target audience, ads declaration, news app declaration, government app declaration, health declarations where relevant.
- Upload an app bundle to a testing track. Internal testing is instant and unlimited; closed testing is what the requirement below refers to.
- Set up the store listing — title, short description, full description, graphics, feature graphic.
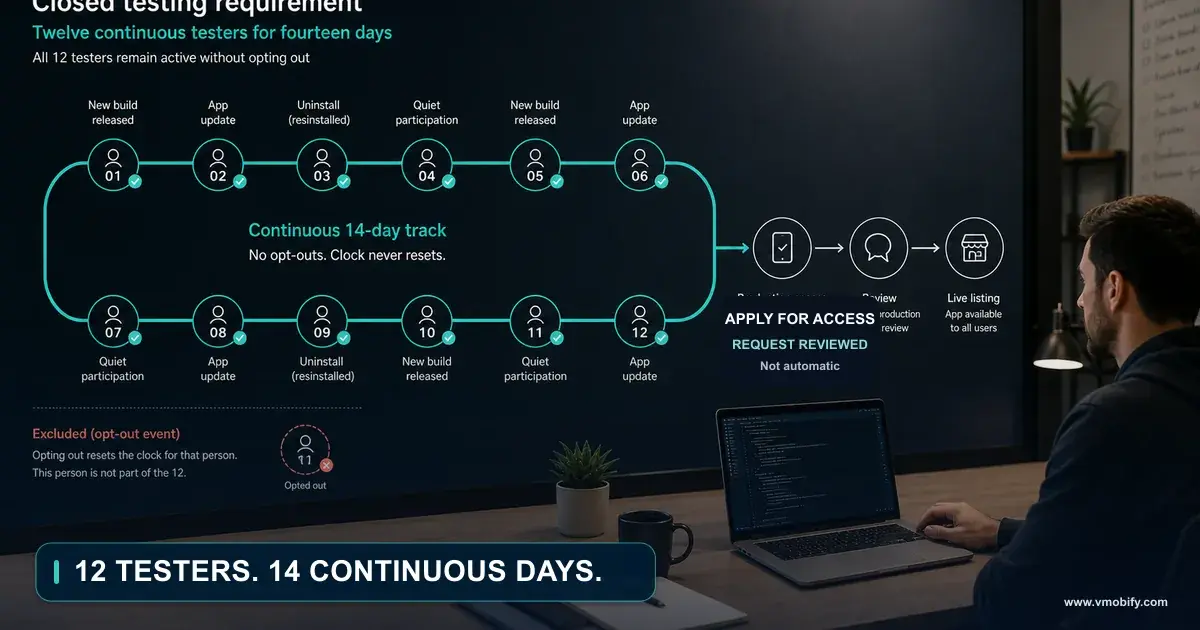
- Run closed testing if you are a new personal account: 12 testers opted in continuously for 14 days, then apply for production access. This is covered in full in our closed testing guide.
- Promote to production and choose a staged rollout percentage.
The testing tracks are worth understanding as a ladder rather than a set of options. Internal testing takes up to 100 testers, is available immediately, and has no review — this is your equivalent of TestFlight internal, and there is no reason not to use it from your first build. Closed testing is invitation-based via email lists or Google Groups, and it is the track the production-access requirement refers to. Open testing is public, discoverable on Play, and lets anyone opt in — useful for building an audience before launch, but it means anyone can find a half-finished app under your developer name.
Most first launches should use internal from day one, closed for the requirement, and skip open entirely unless there is a deliberate reason to have a public beta. The common mistake is going straight to closed testing with twelve strangers before the app has been through internal testing at all — which means your twelve testers spend the first three days of a fourteen-day clock reporting crashes you could have found yourself.
Use the staged rollout. Google lets you release to a percentage of users and increase it as you watch crash rates and reviews, and there is no reason for a first launch to go to 100% immediately. Starting at 10-20% means a crash that only reproduces on a device you never tested affects a fraction of your users and can be halted rather than recalled.
The other Android-specific gate to check early is the target API level. Google raises the minimum annually, with the deadline falling in late August, so confirm the current requirement in Google's target API documentation before you build the release you intend to ship.
Which declarations trip up first-time publishers?
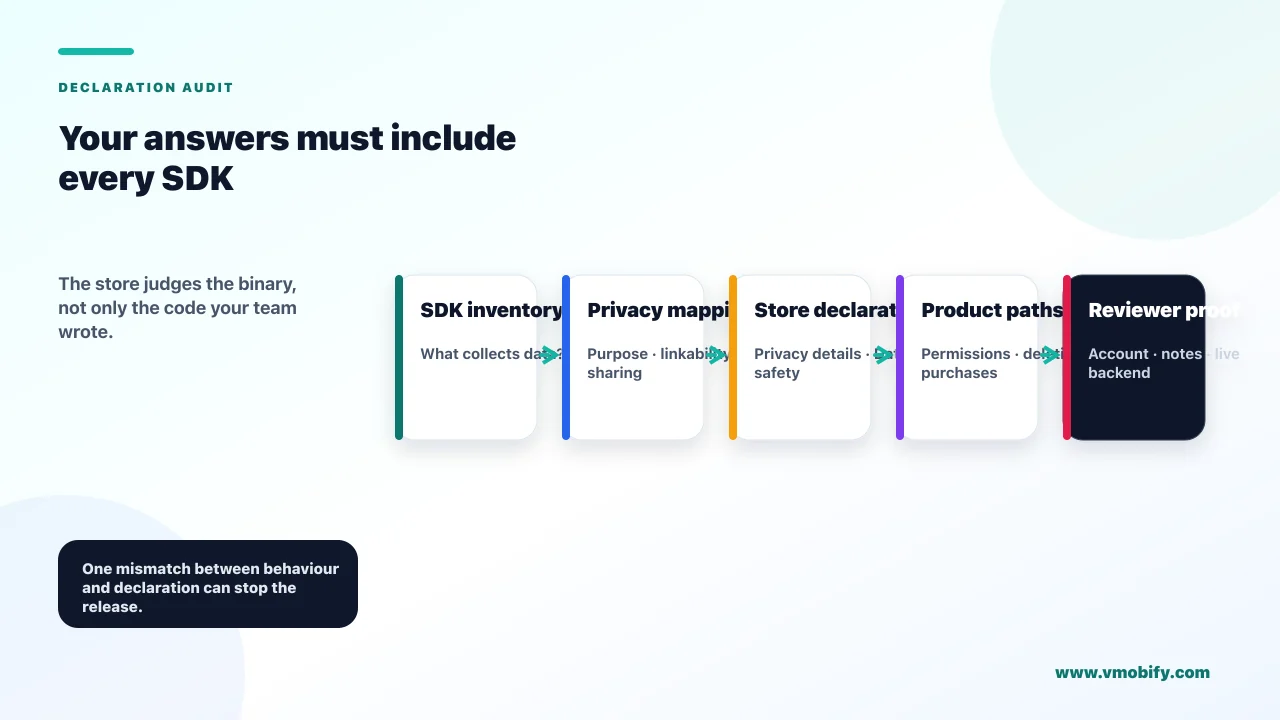
The declarations that cause problems are the ones asking about data you did not realise you collect — because third-party SDKs collect on your behalf and you are answering for all of them. This is where most first-time publishers give an answer that is honest and wrong.
The recurring ones:
- Data safety (Play) and privacy details (App Store). Both ask what data your app collects, whether it is linked to identity, and whether it is used for tracking. Your answer must cover analytics, crash reporting, attribution and advertising SDKs — not only the fields in your own sign-up form. Apple's app privacy documentation sets out the categories.
- Content rating questionnaire. Answer accurately rather than aspirationally. Under-rating to widen the audience is easy to detect and reads as deliberate.
- Ads declaration. If any SDK in your build can serve an ad, the app contains ads — including a free tier of an analytics product that has an advertising component.
- Target audience and children's policies. Declaring an audience that includes children pulls in a materially stricter policy set on both stores. Do not tick it casually.
- Account deletion. If your app has sign-up, both stores now expect a deletion path — Apple inside the app, Google with a web-facing route as well.
- Permissions justification. Anything sensitive needs a reason tied to core functionality.
The technique that makes this tractable: build the SDK inventory once, as a table listing every library, what it collects, whether it links to identity and whether it is used for tracking. Then fill both stores' forms from that single table. Doing it twice from memory is how the two declarations end up contradicting each other — and a contradiction between your two stores is visible to anyone who looks.
Keep the table in the repository and update it whenever a dependency is added. Declarations have to be revisited at every release, and the version of you that ships in eight months will not remember what the analytics SDK collects.
What actually happens when you press submit?
On iOS, a person opens your app and checks it against the guidelines. On Android, automated checks run first and a human review follows for a subset — which is why Android approvals feel faster and Android policy problems tend to surface later. The two systems fail differently, and expecting one to behave like the other causes most of the confusion.
The iOS flow moves through Waiting for Review, In Review, and then either Pending Developer Release, Ready for Sale, or Rejected. Apple states that 90% of submissions are reviewed in less than 24 hours. A rejection arrives in Resolution Center as a guideline citation with a paragraph of policy text and no instruction about what to change.
The Android flow is less visible. A first submission from a new account takes longer than subsequent updates — days rather than hours is normal — and much of the checking is automated. The practical consequence is that Play will sometimes approve something that later triggers a policy enforcement email, whereas Apple tends to catch the same issue at the gate. Neither is more lenient overall; they simply place the checkpoint in different places.
One asymmetry is worth planning around. Because Android's first-pass checking is automated and iOS's is human, the same app frequently sails through Play and gets a detailed rejection from Apple — and inexperienced teams read that as Apple being difficult. The more useful reading is that Apple told you something about your app for free, and Play has not checked it yet. Findings from an Apple rejection are usually worth applying to the Android build too, whether or not Play has objected, because a policy enforcement email after launch is considerably worse than a rejection before it.
What to do while you wait:
- Do not schedule anything against the approval date. Announcements, ad campaigns and press should be scheduled against the day you press release, which is under your control if you chose manual release.
- Keep the build you submitted installed on a device, so you can reproduce anything a reviewer reports without guessing which version they saw.
- Prepare the first update. There will be one, and having it half-built removes the temptation to rush a fix through review.
How long does each platform really take?
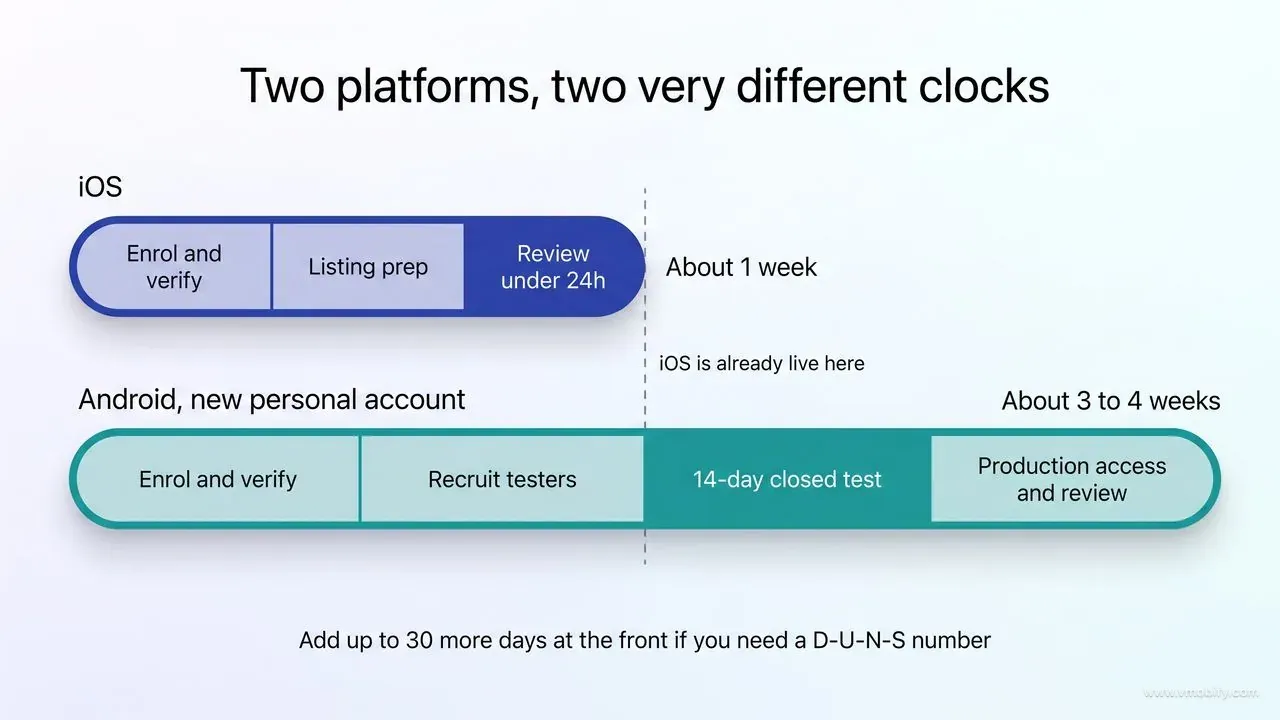
iOS can go from finished build to live in about a week; Android with a new personal account takes about a month, because closed testing sits in front of everything. Planning against the wrong one of those numbers is the most common launch-scheduling mistake.
The realistic shapes:
- iOS: enrolment and verification a few days, listing preparation a few days in parallel with development, review usually under 24 hours, plus buffer for one rejection cycle. Call it a week from finished build to live, assuming the account already exists.
- Android, existing or organisation account: similar, with a slower first review. Roughly a week.
- Android, new personal account: add the closed testing requirement — about two days to recruit and confirm opt-ins, 14 days of testing, up to seven days for production access, then production review. Three to four weeks, and none of it can be compressed.
- Either platform, organisation account with no D-U-N-S number yet: add up to 30 days at the very front.
Two planning rules follow. First, start the accounts and paperwork six weeks before you want to launch, regardless of how far along the app is — it is the one workstream that runs entirely in parallel with development and blocks everything if left late. Second, if you are shipping both platforms and want them live together, start Android first. It is counter-intuitive, since iOS is usually the harder build, but the Android clock is the longer one.
If simultaneity is not a requirement, launching iOS first while the Android clock runs is usually the better sequence — you get real users, real feedback and real store data weeks earlier. Our iOS versus Android launch comparison covers how to make that call for your specific market and audience.
What should be scheduled for launch day itself?
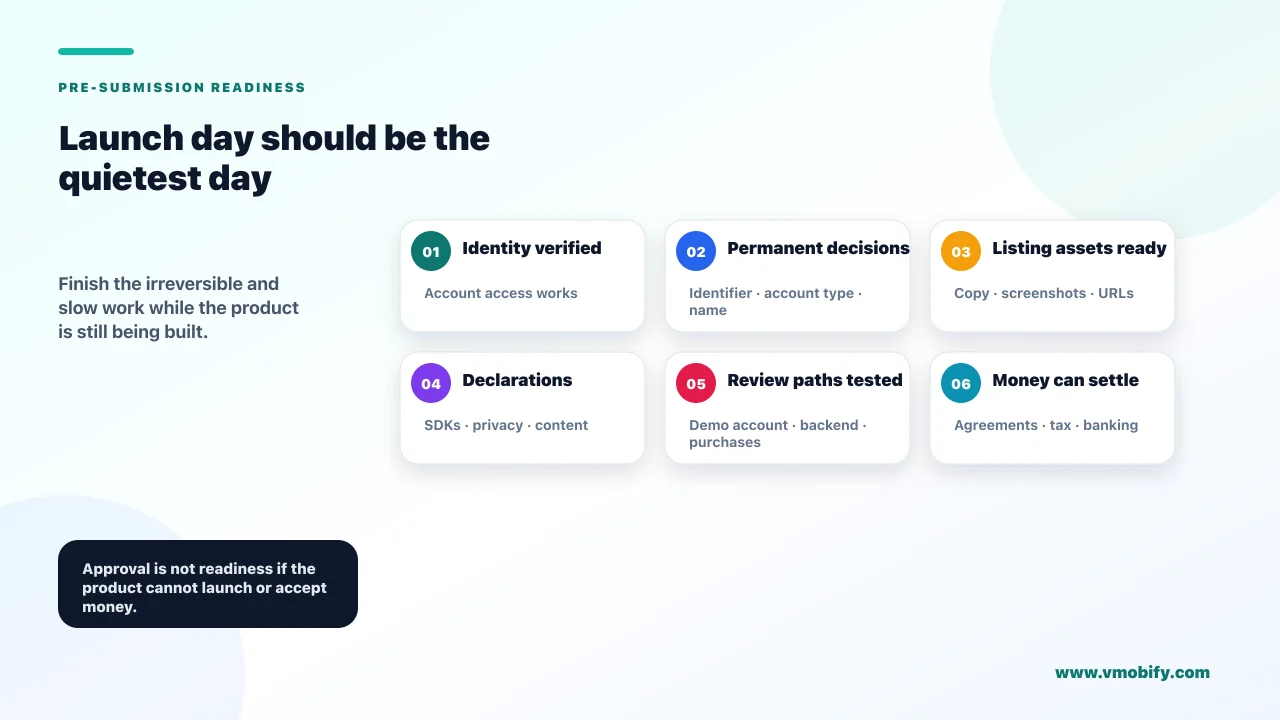
Launch day should be the least eventful day of the process, because everything that could be prepared in advance already was. If you are writing your app description on the day you go live, the launch has already gone wrong.
What should already exist before you press release:
- A store listing you have tested on someone who has never seen the app. Show them the screenshots and ask what the app does. If they cannot say, the listing is not ready.
- Analytics and crash reporting verified on a production build — not just installed, but confirmed firing.
- A short list of people who will install on day one and, on iOS, can leave a review. Early velocity and early ratings both matter more than their absolute numbers suggest.
- Your first-week acquisition plan, drafted rather than improvised. Our first 10,000 installs playbook is the version of that plan we would run.
- A staged rollout percentage chosen on Android, and a monitoring window in your calendar.
Then, in the first 48 hours, watch three things and ignore everything else: crash-free rate, the first reviews, and where installs are dropping off in onboarding. Install count is the number everyone stares at and the least useful of the four — early install volume mostly reflects who you told, while the other three tell you whether the product is ready for you to spend money driving more.
Resist shipping an update in the first 24 hours unless something is genuinely broken. There is a strong instinct to fix the first small thing a user mentions, and it usually costs a review cycle for a change nobody else noticed. Collect for a few days, then ship one update that addresses several things at once.
Publishing is the start of the work rather than the end of it — the store listing you shipped is version one of an asset you will iterate for as long as the app exists. If you want a second pair of eyes on a listing before it goes live, or a plan for the first month after, talk to our team.
Frequently Asked Questions
How much does it cost to publish an app?+
Apple charges $99 per year for the Apple Developer Program. Google charges a US$25 one-time registration fee for a Play Console account. The fees are rarely the constraint — identity verification and, on Android, the closed testing requirement take far more time than the payment does.
How long does it take to get an app published?+
On iOS, roughly a week from finished build to live, since Apple reviews 90% of submissions in under 24 hours. On Android with a new personal account, three to four weeks, because 12 testers must stay opted in for 14 continuous days before you can even apply for production access.
Should I use a personal or organisation developer account?+
An organisation account publishes under your company name, survives a change of owner, and on Google Play avoids the closed testing requirement. But it needs a D-U-N-S number, which Google warns can take up to 30 days to obtain — so it is the right choice for a company publishing multiple apps, and rarely the fast route for a single launch.
Can I change my app name or bundle ID after publishing?+
The app name can be changed, though renaming a ranking app costs some of the association users and the store algorithm have built. The bundle ID or package name cannot be changed — publishing under a new one means a new app with no users, reviews or ranking history.
Do I need a privacy policy to publish an app?+
Yes, on both stores, at a live URL. It must identify what data you collect and how, cover third parties you share it with, and explain retention, deletion and how a user revokes consent. Generic generator output usually fails on those last clauses.
Which store should I launch on first?+
If you want both live on the same day, start Android first — the closed testing clock is the longer one. If simultaneity is not required, launching iOS first while the Android clock runs gets you real users and store data weeks earlier.
What is the most common reason a first launch is delayed?+
Paperwork that was started too late — an entity that does not exist yet, a D-U-N-S application with a 30-day lead time, or tax and banking details that are not signed off, so an approved app cannot take payment. Almost none of the common delays are engineering delays.
Sources
- Apple — Choosing a membership — Apple Developer Program at $99/year and the Enterprise Program at $299/year
- App Store Connect Help — Submitting for review — The iOS submission flow, Notes for Review and release options
- Apple — App privacy details on the App Store — Privacy declaration categories, including data collected by third-party SDKs
- Apple — App Store Review Guidelines — The rules a submission is checked against, including completeness and metadata
- Play Console Help — Required information to create an account — Identity verification and the D-U-N-S requirement for organisation accounts
- Play Console Help — App testing requirements — The closed testing gate for new personal accounts before production access
- Android Developers — Target API level requirements — The annually tightening target API deadline that gates production releases
- Android Developers — Launch best practices — Google's own guidance on testing tracks and staged rollouts
About the author
Amol Pomane — Founder, Vmobify
Amol leads Vmobify, a mobile app growth agency that has driven 30M+ downloads and ranked 54K+ keywords across 300+ apps since 2013. He writes about ASO, paid user acquisition, retention, and the operational reality of scaling mobile apps in India and global markets.